Integrating 3D Model Stone Wall 201 into Your Creative Workflow
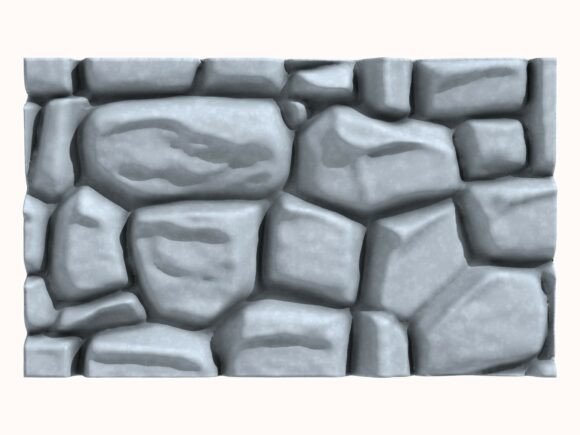
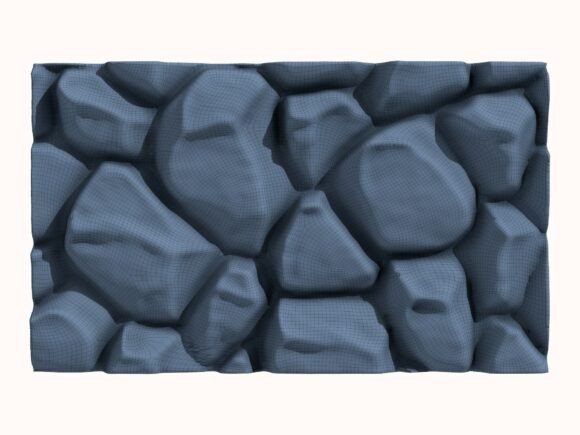
The 3D Model Stone Wall 201 is a high-quality, meticulously crafted 3D model designed for various applications, including architectural visualization, game development, and 3D printing. This model, created entirely by hand in Cinema 4D, offers a detailed and authentic representation of a stone wall, making it an invaluable asset for professionals and hobbyists alike.
Understanding the 3D Model Stone Wall 201
The 3D Model Stone Wall 201 is composed of 37,268 points and 37,269 polygons, providing a highly detailed and realistic texture. The model is available in multiple formats, including C4D, STL, OBJ, FBX, ABC, and DAE, ensuring compatibility with a wide range of 3D software and platforms. Additionally, the package includes six high-quality JPEG renders (2000x2000px, 300 DPI) that showcase the model from different angles, giving you a comprehensive view of its features and potential uses.
Preparation and Compatibility
Before integrating the 3D Model Stone Wall 201 into your project, ensure that your 3D software supports the file formats provided. Most professional 3D modeling and rendering software, such as Blender, Maya, and 3ds Max, support these formats. If you are using a specific platform, check the compatibility to avoid any issues during the import process.
For 3D printing, the STL format is particularly useful, as it is widely supported by most 3D printers. Ensure that your 3D printer's slicing software can handle the model's complexity and size. Adjusting the model's scale and orientation may be necessary to fit the print bed and achieve the desired outcome.
Incorporating the 3D Model Stone Wall 201 into Architectural Visualization
In architectural visualization, the 3D Model Stone Wall 201 can add a touch of realism and detail to your scenes. Whether you are creating a virtual tour, a presentation, or a render for a client, this model can help you achieve a more lifelike and engaging environment.
Tips for Integration:
- Scene Setup: Place the stone wall in a suitable location within your 3D scene. Consider the lighting and camera angles to highlight the model's textures and details.
- Material and Texture Customization: Customize the material and texture settings to match the overall aesthetic of your project. You can adjust the color, roughness, and other properties to create a seamless integration.
- Lighting and Rendering: Use appropriate lighting to enhance the stone wall's appearance. High dynamic range (HDR) lighting can provide natural and realistic illumination. For rendering, ensure that your settings are optimized for the desired level of detail and quality.
Using the 3D Model Stone Wall 201 in Game Development
In game development, the 3D Model Stone Wall 201 can serve as a versatile asset for creating immersive environments. Whether you are developing a medieval-themed game, a fantasy world, or a modern setting, this model can add authenticity and depth to your game's visuals.
Tips for Integration:
- Optimization: Optimize the model for real-time rendering by reducing polygon count if necessary. This can help improve performance, especially in resource-intensive games.
- Texturing and UV Mapping: Ensure that the UV mapping is correct and that the textures are properly applied. This will help the model look consistent and detailed in the game engine.
- Interactivity: If the stone wall is part of an interactive element, such as a destructible object, consider adding physics and collision detection to enhance the gameplay experience.
3D Printing the 3D Model Stone Wall 201
For 3D printing, the 3D Model Stone Wall 201 can be used to create physical prototypes, decorative elements, or even functional components. The STL format is ideal for 3D printing, but you may need to make some adjustments before printing.
Tips for 3D Printing:
- Scale and Orientation: Scale the model to the desired size and orient it correctly on the print bed. Ensure that the model is stable and well-supported to prevent warping or collapsing during the printing process.
- Support Structures: Add support structures if necessary, especially for overhanging parts. This will help maintain the integrity of the printed model.
- Post-Processing: After printing, remove any support structures and clean the model. You can also apply additional finishing techniques, such as sanding and painting, to enhance the final appearance.
Long-Term Use and Maintenance
To get the most out of the 3D Model Stone Wall 201, consider how it fits into your long-term workflow. Keep the model organized in a dedicated folder, and document any customizations or modifications you make. This will help you quickly access and reuse the model in future projects.
Regularly update your 3D software and tools to ensure compatibility and take advantage of new features. This will help you maintain the quality and efficiency of your work, whether you are using the model for architectural visualization, game development, or 3D printing.
Conclusion
The 3D Model Stone Wall 201 is a versatile and high-quality asset that can enhance a wide range of creative projects. By understanding its features, preparing your tools, and following best practices for integration, you can seamlessly incorporate this model into your workflow. Whether you are working on architectural visualization, game development, or 3D printing, the 3D Model Stone Wall 201 is a valuable resource that can help you achieve your creative goals.